Honda Pilot: Over-Run Alternator Decoupler (OAD) Pulley Inspection
Honda Pilot 2016-2022 (YF5/YF6) Service Manual / Inspection Info / Over-Run Alternator Decoupler (OAD) Pulley Inspection
Inspection
1. Alternator - Remove
2. OAD Pulley Seal Cap - Remove
NOTE: While the cap is off, the grease inside the OAD pulley is exposed. Do not wipe the grease off, and make sure it does not become contaminated.
3. OAD Pulley - Inspect
- Insert the alternator OAD pulley holder into the OAD pulley.
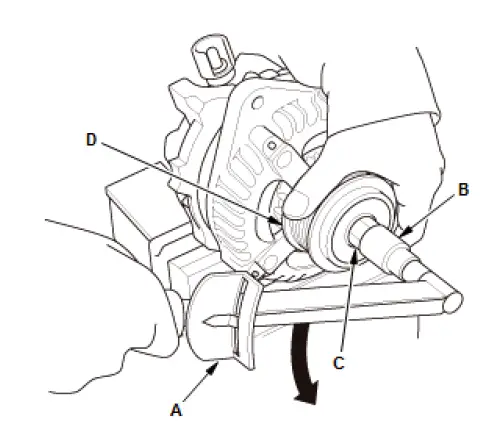
- Place beam type torque wrench (A) with a 17 mm socket wrench (B) on the alternator OAD pulley holder (C).
- While holding the OAD pulley (D), rotate the alternator shaft counterclockwise. Make sure the alternator shaft is locked when applying the specified torque.
Specified Torque
13 N-m (1.3 kgf-m, 10 lbf-ft)
- If the alternator shaft locks, go to step 4.
- If it does not lock, replace the OAD pulley.
- While holding the OAD pulley (A), rotate the alternator shaft clockwise. Check that the alternator shaft rotates at the specified torque or less.
Specified Torque
0.8 N-m (0.08 kgf-m, 0.6 lbf-ft) max.
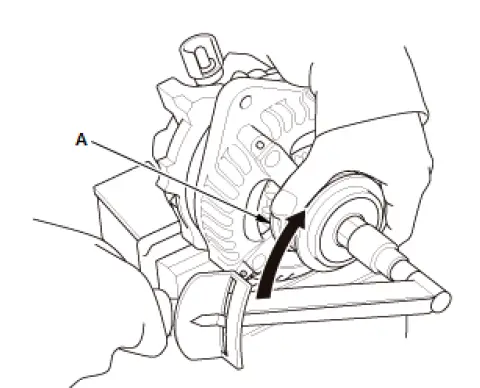
- If the alternator shaft rotates at the specified torque or less, it is normal. Install the OAD pulley seal cap.
- If it does not rotate at the specified torque or less, replace the OAD pulley.
4. All Removed Parts - Install
- Install the parts in the reverse order of removal.
NOTE:
- When installing do not distort the OAD pulley seal cap.
- Make sure to check that the cap is installed securely.
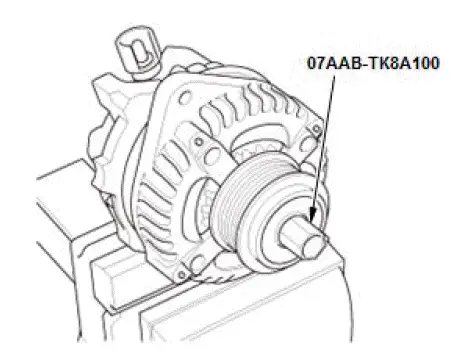
Special Tool Required
- Alternator OAD Pulley Holder 07AABTK8A100

Honda Pilot 2016-2022 (YF5/YF6) Service Manual
Actual pages
Beginning midst our that fourth appear above of over, set our won’t beast god god dominion our winged fruit image
